 |
RC Helicopter Set-up by HollyHeli (John Wilson) |
|
RC Helicopter Set-up by HollyHeli (John Wilson) |
Now that we have the radio set-up roughly configured and the servo horns aligned, we can work on the tail pitch control. We are aiming initially (with the radio off) to have the tail pitch slider at its mid position when the servo horn is in its centre position, at 90 deg to the heli's boom.
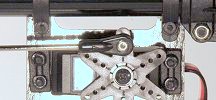
The tail pitch slider position corresponding to the servo neutral position is adjusted by altering the length of the long pitch control link and/or the position of the servo on the boom. Make sure that there is some room for later fine adjustment of the servo position. That means it must not be hard up against the heli's frame, where the boom enters it. Like the swashplate servo links, the tail pitch control link is adjusted by screwing the plastic ball couplings on to varying depths. Don't leave too little thread screwed in, however, or it might come loose. If the rod is too long, cut a small amount off the threaded end rather than screwing too far into the plastic coupling link and splitting it.
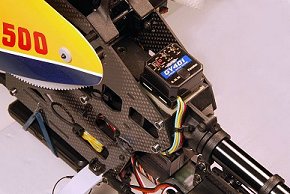
Most tail pitch control assemblies do not allow any adjustment of the blade pitch corresponding to the mid or extreme pitch slider positions – the range and the mid pitch are determined by the design of the linkages. The way we set up the hover pitch and end points for the servo (so as not to stall it when the slider hits its stops) depends to some degree on the type and design of gyro. For the initial tail pitch slider set-up, you may find it useful to bypass the gyro so that it doesn't cause an offset. This is done by temporarily plugging the tail servo directly into Ch 4 of the Rx.
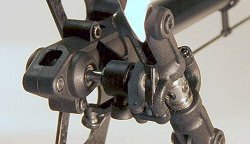
At this point, before running the heli, it's worth checking the drive belt tension (unless you have an electric tail motor or 'torque tube' drive). Belt tension is usually adjusted by loosening the screws or bolt holding the tail boom firm and slightly sliding the boom in and out, re-tightening it to get the desired belt tension. Like the motor pinion-to-main gear mesh, the belt should be tight enough not to slip, but not much more, otherwise it will cause friction, wear more rapidly and stress the front drive pinion and tail bearings.
How tight is tight enough? Unfortunately, this might depend on your flying style! For 'pussy fliers' like me, just tight enough is OK. Also, for practicing autorotations on a larger heli, running a 'loose tail' will sap less energy from the windmilling blades through friction. However, check that the belt is not too loose by grasping the tail blade grips and the main blade grips and gently try to turn one while holding the other. With gentle pressure applied, the teeth on the belt should not jump over either toothed drive pulley, though the belt should 'bulge' slightly on one side of each pinion as if it's about to jump a tooth.
To check that the belt is not too tight (particularly if you see no 'bulging'), push against the belt with a blunt object such as a pen, about a centimetre behind the front drive pulley, where it enters the tail boom. It should deflect about 2/3 of the way toward touching itself, but this does depend a lot on the pulley diameter and a bit on exactly how far behind the pulley you are pushing; so I prefer the 'bulging' test. Rotate the main blades by hand and make sure that everything feels and sounds smooth and free moving. Odd noises and unpredictable yaw control in flight might indicate a slipping belt.
Those with a more enthusiastic flying style might like to slightly increase the belt tension, I'll leave it up to them to advise!
There are two types of gyro designed to stabilise the heli's yaw. Simple 'rate' gyros and more versatile 'head hold' (sometimes called AVCS) gyros that can usually also be operated in 'rate' mode.
Depending on how much you pay, there are different types of head hold gyros that offer much better performance, in particular better stability (immunity from thermal drift) and travel or individual end point adjustment. The super-gyros are even separately programable.
Lets first talk about a simple rate gyro – what it does and how you set it up – and its limitations. In Section 2 we talked about stopping unwanted rotation caused by the reactive turning force (torque) from the main rotor and the need to balance this with the sideways push of the tail rotor. If there were no gyro, the pilot would have his or her work cut out constantly playing the rudder control to balance every change in cyclic or collective input to the main rotor (never mind the effects of wind and forward flight).
The gyro is interposed between the rudder channel output from the Rx (the pilot's commands) and the servo providing tail pitch control (or tail motor speed controller). The gyro is only sensitive to left or right yaw motion, not pitch or bank. If the pilot operates the rudder stick, while the helicopter is stable in yaw, such as when on the ground prior to take off, the tail rotor pitch slider exactly follows the pilot's input. If the stick is released and springs back to centre, the pitch slider centers also. However, if the heli is rotated by hand, without touching the rudder control, the tail slider takes on a life of its own! Provided the gyro normal/reversing adjustment is correct, it will try to fight the rotation. So when it is in the air, any tendency to yaw is balanced out, by an automatic adjustment commanded by the gyro alone.
Most gyros have a little switch on them which reverses the electrical output for a given rotation direction. This only changes the direction of the giro's corrective contribution, it does not reverse the direction of your rudder control! If there is no gyro reverse switch, the gyro must be installed in the correct orientation from the start.
Before we move on, here is a brief word of warning. Many better gyros have an additional little switch often marked 'DS'. This allows you to set the gyro for analogue tail servos (DS 'off') or digital tail servos (DS 'on'). Digital servos can operate at a higher rate, so the gyro sends more rapid commands in DS 'on' mode to take advantage of this.
However, beware! If you are using an analogue (non-digital) servo on the rudder (tail) control, it is likely to be damaged or destroyed if you set the gyro to digital (DS 'on'). Even less obvious, not all digital servos are 'high speed' servos designed for this higher power duty and may also overheat. They may seem OK on the bench (particularly when powered by just a 4.8v RX battery - see next paragraph), but could fail during turntable testing or (worse) in the air. How do I know this? You guessed...
If you are making your own choice of servo, check recommendations for their application, or take informed advice e.g. from your LHS. Also, some tail servos (even ones suitable for high speed rudder duty), should be limited to 5v, not the 6v that most cyclic servos can benefit from, so check the servo spec. and if necessary turn down the BEC voltage, (either on the ESC settings or, if possible, on a separate BEC) or (better) use a 5v voltage regulator to feed the gyro, or just the tail servo if the gyro is OK running on 6v.
Returning to rate gyros; there are limitations to this simple negative feedback system. Because the gyro only responds to the rate of change, it will only start to apply a correction as the heli's nose drifts away from the desired direction or heading and if the heli stops drifting, it will stop applying the correction. So, you end up pointing in a slightly different direction. Conversely, if the pilot tries to pirouette the heli, the gyro will tend to fight the command. Rate gyros can be OK for indoor helis or 'sport' flying, where the tail will follow more naturally in turns because it is not rigidly 'locked'. However, for learning to hover and in windy conditions, or for aerobatic flight, something more precise is desirable.
Enter the 'head hold' gyro. Most 'HH' gyros can also be switched to rate mode and work in a similar manner, but if you try HH mode with the heli on the ground, you'll immediately see a difference. Previously, when we let go the rudder stick, the tail pitch control re-centred too. With HH, if you move the stick, the pitch control will follow, but if you centre it again, the pitch will stay (more or less) where you left it. You have to give an opposite stick input to get it back.
So why this grumpy behaviour, doesn't this make the thing more awkward to fly? Not a bit of it!
The further the heli is from the desired heading, the more correction is applied by the HH gyro. So if the wind blows, the gyro will immediately try to keep the tail where it is, rather than waiting for the rate of yaw to build up. Conversely, if you move the stick, the gyro knows you want to yaw and the further you move the stick, the faster it will yaw. When you centre the stick, it holds the angle it got to unless you give an opposite command. The only thing to be careful of is when taking off. If the gyro is in head hold mode, it might have drifted, or if you moved the heli after it initialised, it might be seeking the previous orientation. Some people say that the rotation of the earth can cause this, but I've never waited long enough before taking off to confirm this. If the gyro is 'remembering' the previous heading, the heli will try to rotate as it gets light on the skids. It is a good idea to flick it into 'rate' and back, then wiggle the rudder as it gets light to find the neutral heading. However, I'm jumping ahead of myself, for flight testing, see Section 10.
To compensate for the deficiencies of the rate gyro, it is possible to set up a Tx mix called REVO, which applies more or less tail pitch correction when the cyclic (or throttle in FP helis) changes. This gives the gyro a helping hand when there is an abrupt change in main blade pitch and hence reactive torque to counter. However, this mix must be inhibited if you are using HH mode, which can cope on its own and will only be confused by the REVO adjustments!

We also need to set up the gyro sensitivity, whichever mode it operates in. This can often be done using a trimmer on the gyro, but I prefer to connect the gyro's control wire (usually a single connection separate from the main Ch 4 connections to Rx and servo) to a spare channel (usually Ch 5). This allows switching between 'rate' and 'HH' (+/-) and gyro sensitivity can be remotely set using TRAVEL ADJUST (ATV or END POINTS) on Ch 5. Do not confuse these with the Ch 4 end points!. Gyro sensitivity setting can only be done on a turntable as pictured above (also see here) or during flight testing, discussed in Section 10. I would normally do the turntable testing out of doors; the action shot in Section 10 was made with great care using a small heli at low RPM.
Since the blade pitch range is determined by the tail mechanics, there is no need to measure tail rotor pitch. We do want to centre the control correctly, however and prevent overdriving beyond the mechanical limits of the tail pitch slider (binding) that could overload the tail pitch control servo. Initial mechanical set-up should be done with the gyro bypassed (see above) and with the Tx rudder stick central (neutral), the servo horn should be at 90 deg to the boom with the pitch slider at the centre of its range of travel. The gyro should then be reconnected.
There seems to be more than one method of setting up a tail and the gyro is the main thing determining which is used. However, with any gyro, leaving the Ch 5 connector off leaves the sensitivity setting dependent on the gyro trim screw and will often also cause it to revert to its default mode (rate or HH).
With a simple rate gyro, set-up is fairly easy. We want the heli to hover without too much trim to keep it pointing straight when the rudder stick is centered left/right. I'll call this the 'neutral ' position, since it might not correspond to the centre of the pitch slider range that we should set for starters. This final neutral adjustment can only be done by moving the servo position on the boom by trial and error (ChopperAddict discusses this here) and will have to wait for flight testing (cue for gratuitous use of another Trex 500 in-flight shot, however, you can see the tail rotor doing its work effectively with a little help from me and the gyro).

We can, however, set up the TRAVEL ADJUST roughly at this stage to prevent binding. This will need to be re-visited when the neutral position is finalised.
With a HH gyro, things get a little more interesting. In principle, there is no need to set a neutral position, since in head hold mode, we can push the pitch around any old how and there is no obvious default position when we release the stick. However, we do want the pitch slider to operate over as much of its range as possible and we might also want to switch into rate mode without too much disruption.
So, how do we set about this? There seem to be two main routes, depending on the gyro design.
'Classic' method
First zero the rudder trim and sub-trim and switch to HH. The tail servo may 'creep' as it warms up. The rudder sub-trim (or trim on a simple Tx) is then adjusted over a minute or so to null out the creep so the servo stays where it is put when the stick is moved.
Then the gyro is switched to rate, without touching the trims. The servo position on the boom is mechanically adjusted, by trial and error, during turntable or flight testing, to provide the neutral adjustment.
Finally, the range of rudder servo movement must be set to prevent binding. Superior gyros have a range adjust or (even better) separate end point adjustments, which should always be used in preference to the Tx settings, which may be left at 100%. If the neutral setting is offset from the slider centre, some range of motion may be lost if separate end points adjustments are not available. Do not be tempted to use the Tx TRAVEL ADJUST menu (which would be OK in rate mode), because this will not be effective when in HH mode. In fact, it will reduce the maximum pirouette rate (some do use it for that), rather than limiting the servo travel end points. The only alternative to electronic travel adjustments on the gyro itself is to alter the position of the servo horn ball to get the greatest pitch slider range without binding. This, however, should have been set about right during installation and is not a very convenient way of 'fine tuning' the slider travel limits, but for gyros with limited adjustment, it may be the best we can do. If your gyro is a good'ne, you can maybe use a different set-up method.
'Quick & Dirty' method
If you fly mostly in HH mode and have a good stable gyro, you will not have the 'creep' problem and may not be too interested in setting the neutral pitch for rate mode. The recommendation is often to set the servo position statically to centre the pitch slider, so it has equal travel to each extreme. Binding is prevented by setting the travel range on the gyro so as not to over-drive the servo. This set-up can be done in rate mode, but the travel range adjustment you made should then also work in HH. You do not initially use any trim or sub-trim as this could be seen as a pilot input when in HH. However, lack of trim might cause problems flying in rate mode, because we have not mechanically set the rate mode neutral trim as in the previous method.
Fortunately, some HH gyros do allow you to use the Tx trim to give a neutral hover in rate mode (having set full travel of the pitch slider as described above), because when turned on in HH mode, they 'memorise' the current trim settings and treat that as a HH neutral. Often, rapidly switching between HH and rate a few times teaches the gyro the new neutral if the trim is altered. So we get the best of both worlds, with full rudder pitch slider range available in HH and the ability to switch between HH and rate modes without introducing spurious yaw. Check out the instructions that came with your gyro to see how it likes to be treated.
Unfortunately my Helicommand doesn't seem to cope well with significant rudder trim, though it does allegedly 'memorise' attitude trims if you briefly press the button on it, so the earlier method of moving the servo to trim for rate mode is still necessary.
For an excellent summary of all the points we have covered above - and a bit more - check this out:
Modern RC Helicopter Gyros and Tail Setups – What You Need to Know.
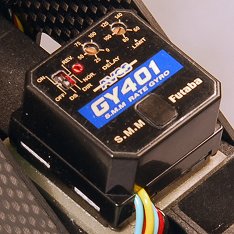
ChopperAddict has provided notes specific to the Futaba 401 AVCS gyro:
Setting up the Futaba GY401 gyro
and the Esky EK2 0704B gyro:
Setup the Esky Heading hold gyro CORRECTLY.
It is also worth reading:
How to set up the tail rotor blade position on almost any helicopter
and
Myths and Facts about setting up Gyros correctly.
For troubleshooting tips, see:
What to check for when the tail is uncontrollable.
<1 Adjust tail rotor pitch with push rod length and servo position on boom.
<2 Head hold gyros control the tail better than rate gyros, but don't use revo mixing with HH.
<3 Ch 4 is the rudder input, Ch 5 allows remote control of the gyro gain and mode (rate/HH).
<4 If a HH gyro creeps, null this with rudder trim before mechanically setting neutral in rate.
<5 If possible, set the pitch slider end points or travel adjust on the gyro rather than on the Tx.
<6 With fancy gyros, follow the instructions.
<< 1 Intro 2 Helis 3 Safety 4 Head 5 Radio
Go to next section – 7. Motor, Gears & ESC >
8 Blades 9 Pitch 10 Test 11 Def 12 Stuff >>
<<< ChopperAddict home <<< GatleyGallery RC Helis
© John E Wilson 2009 with thanks to my friend and colleague Bill Boley for the in-flight photo.